Text

Upgrading a real-world Drupal 6 install to Drupal 7 is a chore. One of the more annoying aspects of the core upgrade process is step 5, 'disabling non-core modules'.

The UI for disabling modules is not nice, particularly once module dependencies are thrown into the mix. It's not a case of simply boring through the list of modules unchecking everything. First you need to uncheck everything you can. Save changes. Then go through the list again disabling the previously greyed out modules (because they still had active dependants) and disabling those. It can take about 4-5 passes before you're done.

Thankfully there is a much easier way using Drush. Drush is a command-line utility for managing aspects of a Drupal installation. Pertinently for Drupal upgraders it provides the ability to:

  • List installed modules
  • Disable modules

Running Drush without any arguments provides a list of commands and options. The two commands we are interested in are 'pm-list' (list installed modules) and 'pm-disable' (disable a module).

For these commands to work, you must issue your calls to drush from within your Drupal site's install directory e.g. /home/user/public_html/drupal

Keep in mind you can get information on any of Drush's commands by issuing a call to the help command.

$ drush help pm-list
  > Show a list of available extensions (modules and themes).
  > 
  > Options:
  >  --type                                    Filter by extension type. Choices:   
  >                                            module, theme.                       
  >  --status                                  Filter by extension status. Choices: 
  >                                            enabled, disable and/or 'not         
  >                                            installed'. You can use multiple     
  >                                            comma separated values. (i.e.        
  >                                            --status="disabled,not installed").  
  >  --package                                 Filter by project packages. You can  
  >                                            use multiple comma separated values. 
  >                                            (i.e. --package="Core -              
  >                                            required,Other").                    
  >  --core                                    Filter out extensions that are not   
  >                                            in drupal core.                      
  >  --no-core                                 Filter out extensions that are       
  >                                            provided by drupal core.             
  >  --pipe                                    Returns a space delimited list of    
  >                                            the names of the resulting           
  >                                            extensions.                          
  > 
  > 
  > Aliases: pml
  

We want a list of non-core modules and we would prefer non-formatted output so our command call looks like this:

$ drush pm-list --type=module --no-core --pipe
  > ad
  > ad_channel
  > click_filter
  > ad_embed
  > ad_cache_file
  > ad_notify
  > ad_owners
  > ad_report
  > ...
  

Now can produce a list of non-core modules to pass to the disable module Drush command.

$ drush help pm-disable
  > Disable one or more extensions (modules or themes). Disable dependant extensions as well.
  >
  > Arguments:
  >  extensions                                A list of modules or themes. You can 
  >                                           use the * wildcard at the end of     
  >                                           extension names to disable multiple  
  >                                           matches.                             
  >
  >
  > Aliases: dis
  

Simple then. Putting it all together we can chain together the module list command output using shell command substitution and pass that output as arguments to the disable command, all in one neat line.

$ drush pm-disable `drush pm-list --no-core --type=module --pipe`
  

Press 'y' in response to the resulting confirmation prompt and the tedious work in the Drupal admin UI is replaced with a neat one-line shell command!
Tags: drupal drush cms
Text

So, Git really is a kernel hacker's versioning system. It's powerful, cool and with not inconsiderable barriers to entry for newcomers. You have to remember a lot of command-line syntax to use it effectively.

Branching and merging on a local repository is trivially simple, but what if you create a local branch on a repository that otherwise syncs up with a remote repository?

Follow these steps (this assumes a remote called origin is set up)

$ git branch my-new-feature
  $ ... # hack away
  $ git commit -a -m 'Initial feature commit'
  $ git push origin my-new-feature
  $ git branch --set-upstream my-new-feature origin/my-new-feature
  

Git pull/fetch/push will now track the newly created remote branch called 'my-new-feature'.

Text

If you want to add a unix user to a supplementary group (say for example user 'aaron' belongs to group 'aaron' but I want to add him to the 'wheel' group as well) you use the usermod command.

$ usermod -a -G wheel aaron
  

The -a argument is very important, it ensures arguments to -G append to the existing list of groups. Otherwise existing groups will be replaced with the argument supplied.

Text

Running a continuous integration process where you generate all your build artefacts on every build will push you to look for speed optimisations.

With an application I am currently configuring for Jenkins, it was taking about 30-35 minutes to generate all the API documentation through PHPDocumentor. I had heard good things about DocBlox - must notably its speed - and it's used by the Zend Framework so I thought I'd sub it in for PHPDocumentor and see if it was quicker.

Installation

DocBlox has a number of dependencies which we also need to install if they are not already.

Use your system's package manager to install the xsl php extension and graphviz.

$ sudo aptitude install php5-xsl
  $ sudo aptitude install graphviz
  

To install DocBlox and PHP-Markdown use PEAR.

$ sudo pear channel-discover pear.michelf.com
  $ sudo pear channel-discover pear.docblox-project.org
  $ sudo pear install --alldeps channel://pear.docblox-project.org/DocBlox-0.13.1
  

How Fast?

DocBlox uses largely the same command line options as phpdoc, so it can act as a drop in replacement if you already have existing build scripts utilising phpdoc.

In terms of speed, well, it's very fast. That 35 minute phpdoc run took just 43 seconds in DocBlox.

Text

A simple useful application for Git's stash feature came about today when I started making some amendments to a repo master branch, forgetting I wasn't on my develop branch. I didn't want to make the changes to the master branch and I didn't want to have to copy the files between the two branches manually.

Git stash to the rescue:

$ git stash save
  $ git checkout develop
  $ git stash apply
  $ git commit -m 'Apply stashed changes'
  
Tags: git scm
Text

If you have cloned a remote git repository you default into a checkout of the master branch. Odds are there will be other remote branches, and usually one called 'develop'.

To start developing on this branch instead of the master, use the following command

$ git checkout -b develop origin/develop
  > Branch develop set up to track remote branch develop from origin.
  > Switched to a new branch 'develop'
  

This command creates a local branch tracking the remote develop branch and switches your working directory to this branch.

If you already have a local develop branch and want it to track the remote you can use this instead

$ git checkout develop
  $ git branch --set-upstream develop origin/develop
  
Tags: git scm
Text

To install the zend framework on your system globally (which means you don't have to bundle it in your local applications, plus you get the zf commandline tool) do the following:

$ sudo pear channel-discover pear.zfcampus.org
  $ sudo pear install zfcampus/ZF
  

When configuring applications, if you wish to use an application's bundled copy of ZF, ensure local libs come first in PHP's include_path.

Text

In Jenkins, when sourcing a project from a Git repository you may find your builds failing. This is due to a configuration problem, where your Jenkins user does not have a git identity set.

To solve the issue change into your jenkins home dir (/var/lib/jenkins on Ubuntu) and add the following to a file named .gitconfig.

[user]
      name = Jenkins
      email = jenkins@localhost
  

That will allow you to avoid this:

Started by user anonymous Checkout:workspace / /var/lib/jenkins/jobs/Bookings/workspace - hudson.remoting.LocalChannel@289d9155 Using strategy: Default Checkout:workspace / /var/lib/jenkins/jobs/Bookings/workspace - hudson.remoting.LocalChannel@289d9155 Cloning the remote Git repository Cloning repository origin Fetching upstream changes from file:///home/aaron/Sites/Bookings Seen branch in repository origin/HEAD Seen branch in repository origin/master Commencing build of Revision fc8a70bc628edb0ac547b3fefc0841db5e06204c (origin/HEAD, origin/master) Checking out Revision fc8a70bc628edb0ac547b3fefc0841db5e06204c (origin/HEAD, origin/master) FATAL: Could not apply tag jenkins-Bookings-1 hudson.plugins.git.GitException: Could not apply tag jenkins-Bookings-1 at hudson.plugins.git.GitAPI.tag(GitAPI.java:698) at hudson.plugins.git.GitSCM$4.invoke(GitSCM.java:1181) at hudson.plugins.git.GitSCM$4.invoke(GitSCM.java:1129) at hudson.FilePath.act(FilePath.java:758) at hudson.FilePath.act(FilePath.java:740) at hudson.plugins.git.GitSCM.checkout(GitSCM.java:1129) at hudson.model.AbstractProject.checkout(AbstractProject.java:1193) at hudson.model.AbstractBuild$AbstractRunner.checkout(AbstractBuild.java:555) at hudson.model.AbstractBuild$AbstractRunner.run(AbstractBuild.java:443) at hudson.model.Run.run(Run.java:1376) at hudson.model.FreeStyleBuild.run(FreeStyleBuild.java:46) at hudson.model.ResourceController.execute(ResourceController.java:88) at hudson.model.Executor.run(Executor.java:175) Caused by: hudson.plugins.git.GitException: Error performing command: git tag -a -f -m Jenkins Build #1 jenkins-Bookings-1 Command "git tag -a -f -m Jenkins Build #1 jenkins-Bookings-1" returned status code 128: *** Please tell me who you are.

Run

git config --global user.email "[email protected]" git config --global user.name "Your Name"

to set your account's default identity. Omit --global to set the identity only in this repository.

fatal: empty ident <jenkins@blizzard.(none)> not allowed

at hudson.plugins.git.GitAPI.launchCommandIn(GitAPI.java:744)
  at hudson.plugins.git.GitAPI.launchCommand(GitAPI.java:709)
  at hudson.plugins.git.GitAPI.launchCommand(GitAPI.java:719)
  at hudson.plugins.git.GitAPI.tag(GitAPI.java:696)
  ... 12 more
  

Caused by: hudson.plugins.git.GitException: Command "git tag -a -f -m Jenkins Build #1 jenkins-Bookings-1" returned status code 128: *** Please tell me who you are.

Text

I want to look at how to get a very simple PHP project setup in Jenkins using the standard suite of tools and templates as demonstrated on php-jenkins.org.

If you do not have Jenkins installed or are not sure you have your environment setup correctly, please checkout my previous tutorial Getting Started With Jenkins for PHP.

A quick checklist

Before we start, make sure you have your environment and Jenkins installation up and running and appropriately configured.

  • You have a JVM and Jenkins installed running at http://localhost:8080
  • You have the following Jenkins plugins installed
    • checkstyle
    • cloverphp
    • dry
    • htmlpublisher
    • jdepend
    • plot
    • pmd
    • violations
    • xunit
  • You have the following PEAR packages installed
    • pdepend/PHP_Depend
    • phpmd/PHP_PMD
    • phpunit/phpcpd
    • phpunit/phploc
    • PHPDocumentor
    • PHP_CodeSniffer
    • phpunit/PHP_CodeBrowser
    • phpunit/PHPUnit
    • phpunit/ppw
  • You have Ant installed
  • You have Git installed and are familiar with its basic use
  • You have the Zend_Framework installed globally as a PEAR package

If you don't have the above installed please refer to the Getting Started With Jenkins for PHP tutorial.

If you're not familar with Git, have a quick read of git-scm.org or refer to my Git cheatsheet.

To install the Zend Framework as a PEAR package see my post on Installing Zend Framework from PEAR.

Create your project

I'm basing this tutorial on a sample Zend Freamework application, you're free to use whatever codebase you like. But for the purposes of this tutorial I'm using this project as a starting point: [email protected]:ajbonner/Bookings.git.

$ git clone https://github.com/ajbonner/Bookings.git ./bookings
  $ cd bookings
  $ ppw --name 'Bookings' --source ./application .
  

This will generate an ant build file with some general defaults for PHP_CodeSniffer and PHP Mess Detector along with a standard phpunit configuration file.

First thing, we'll need to make a small amendment to the phpunit configuration file, since we're testing a Zend Framework application, we need to make sure PHPUnit loads a custom bootstrap before running tests. Open up the generated phpunit.xml.dist file and change the opening phpunit element to look like this:

<phpunit backupGlobals="false"
                backupStaticAttributes="false"
                strict="true"
                verbose="true"
                colors="true"
                bootstrap="tests/bootstrap.php">
  

Our build environment is now configured correctly to run Zend Framework Test Cases, we have our ant build file setup and some defaults configured for our code coverage and analysis tools. Let's add our new build and phpunit configuration files to git and commit our changes. Then we can run ant and see what happens.

$ git add build.xml phpunit.xml.dist
  $ git commit -m 'Add build and test configuration files'
  $ ant
  >> Buildfile: /home/aaron/Sites/Bookings/build.xml
  >> clean:
  >>    [delete] Deleting directory /home/aaron/Sites/Bookings/build/api
  >>    [delete] Deleting directory /home/aaron/Sites/Bookings/build/code-browser
  >>    [delete] Deleting directory /home/aaron/Sites/Bookings/build/coverage
  >>    [delete] Deleting directory /home/aaron/Sites/Bookings/build/logs
  >>    [delete] Deleting directory /home/aaron/Sites/Bookings/build/pdepend
  >>     [mkdir] Created dir: /home/aaron/Sites/Bookings/build/api
  >>     [mkdir] Created dir: /home/aaron/Sites/Bookings/build/code-browser
  >>     [mkdir] Created dir: /home/aaron/Sites/Bookings/build/coverage
  >>     [mkdir] Created dir: /home/aaron/Sites/Bookings/build/logs
  >>     [mkdir] Created dir: /home/aaron/Sites/Bookings/build/pdepend
  >> 
  >> parallelTasks:
  >> 
  >> phpcpd:
  >> 
  >> pdepend:
  >>      [exec] PHP_Depend 0.10.5 by Manuel Pichler
  >>      [exec] 
  >>      [exec] Parsing source files:
  >>      [exec] ....                                                             4
  >>      [exec] 
  >>      [exec] Executing Coupling-Analyzer:
  >>      [exec]                                                                 18
  >>      [exec] 
  >>      [exec] Executing CyclomaticComplexity-Analyzer:
  >>      [exec] .                                                               24
  >>      [exec] 
  >>      [exec] Executing Dependency-Analyzer:
  >>      [exec]                                                                 17
  >>      [exec] 
  >>      [exec] Executing Inheritance-Analyzer:
  >>      [exec]                                                                  5
  >>      [exec] 
  >>      [exec] Executing NodeCount-Analyzer:
  >>      [exec]                                                                 14
  >>      [exec] 
  >>      [exec] Executing NodeLoc-Analyzer:
  >>      [exec] phpcpd 1.3.2 by Sebastian Bergmann.
  >>      [exec] 
  >>      [exec] 0.00% duplicated lines out of 119 total lines of code.
  >>      [exec] 
  >>      [exec] Time: 0 seconds, Memory: 2.75Mb
  >>      [exec] .                                                               22
  >>      [exec] 
  >>      [exec] Generating pdepend log files, this may take a moment.
  >>      [exec] 
  >>      [exec] Time: 00:00; Memory: 9.50Mb
  >> 
  >> phpcs:
  >> 
  >> phpmd:
  >>      [exec] Result: 1
  >> 
  >> phploc:
  >>      [exec] phploc 1.6.1 by Sebastian Bergmann.
  >>      [exec] 
  >>      [exec] Directories:                                          1
  >>      [exec] Files:                                                4
  >>      [exec] 
  >>      [exec] Lines of Code (LOC):                                119
  >>      [exec]   Cyclomatic Complexity / Lines of Code:           0.08
  >>      [exec] Comment Lines of Code (CLOC):                        18
  >>      [exec] Non-Comment Lines of Code (NCLOC):                  101
  >>      [exec] 
  >>      [exec] Namespaces:                                           0
  >>      [exec] Interfaces:                                           0
  >>      [exec] Classes:                                              4
  >>      [exec]   Abstract:                                           0 (0.00%)
  >>      [exec]   Concrete:                                           4 (100.00%)
  >>      [exec]   Average Class Length (NCLOC):                      22
  >>      [exec] Methods:                                              9
  >>      [exec]   Scope:
  >>      [exec]     Non-Static:                                       9 (100.00%)
  >>      [exec]     Static:                                           0 (0.00%)
  >>      [exec]   Visibility:
  >>      [exec]     Public:                                           8 (88.89%)
  >>      [exec]     Non-Public:                                       1 (11.11%)
  >>      [exec]   Average Method Length (NCLOC):                     10
  >>      [exec]   Cyclomatic Complexity / Number of Methods:       1.89
  >>      [exec] 
  >>      [exec] Anonymous Functions:                                  0
  >>      [exec] Functions:                                            0
  >>      [exec] 
  >>      [exec] Constants:                                            0
  >>      [exec]   Global constants:                                   0
  >>      [exec]   Class constants:                                    0
  >> 
  >> phpunit:
  >>      [exec] PHPUnit 3.5.14 by Sebastian Bergmann.
  >>      [exec] 
  >>      [exec] ...
  >>      [exec] .
  >>      [exec] 
  >>      [exec] Time: 1 second, Memory: 19.25Mb
  >>      [exec] 
  >>             OK (4 tests, 16 assertions)
  >> 
  >>      [exec] Writing code coverage data to XML file, this may take a moment.
  >>      [exec] 
  >>      [exec] Generating code coverage report, this may take a moment.
  >> 
  >> phpcb:
  >> 
  >> build:
  >> 
  >> BUILD SUCCESSFUL
  >> Total time: 3 seconds
  >> 
  

If you have everything setup correctly you will have a build directory with a number of artifacts: code coverage analysis, code style reports, dependency analysis, etc. You can look at these directly but it's much more convienient to use Jenkins to view these artifacts.

Importing a Project into Jenkins

We have a working build and we are producing a number of artifacts representing certain aspects of our software. Time now to import the project into Jenkins and have this process ran automatically.

Step 1 - Create a New Jenkins Project

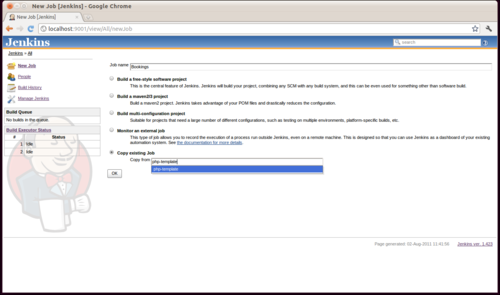
As part of getting our environment ready for Jenkins, we installed a PHP Project Template. To create our new Project, we copy this template, and give our project a name. Choose whatever you like, but for the purposes of this tutorial, I've chosen 'Bookings'.

Step 2 - Configure your New Project

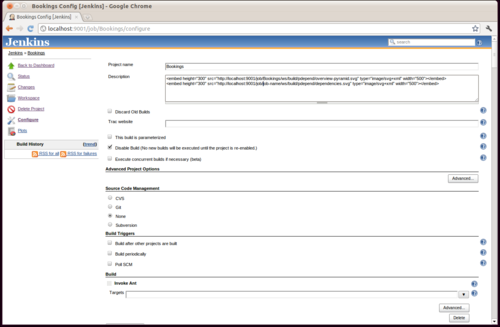
You're now presented with a (at first glance) daunting configuration page. We'll work our way down the page, for the most part we don't need to make major changes.

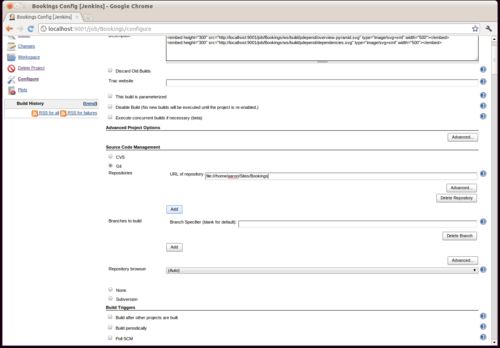
Firstly the pdepend task generates a pair of SVG images, in order to have these display on the project dashboard we need to substitute 'job-name' to 'Bookings' (or whatever you chose for your project name) in the embed tags in the description field.

Next, uncheck 'disable build', naturally we want to perform builds!

The project will be retrieved from the git repository we created during the initial build configuration. Pass in the absolute filesystem path to your repository, for example mine is file:///home/aaron/Sites/Bookings.

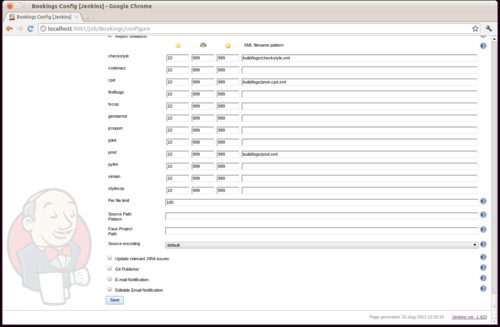
That's it. You now have setup the project in Jenkins and defined a source. The remaining details can be left at their defaults. Scroll down to the bottom of the page and click the save button.

Step 3 - Build the Project

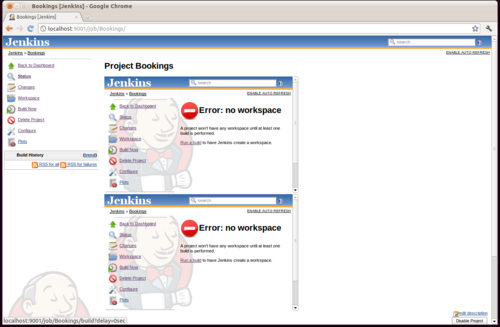
The project needs to first do a build before the project workspace can be initialised. On the left hand project menu is a 'build now' link. Click that and Jenkins will checkout a copy of our project from git then process the ant build.xml we defined.

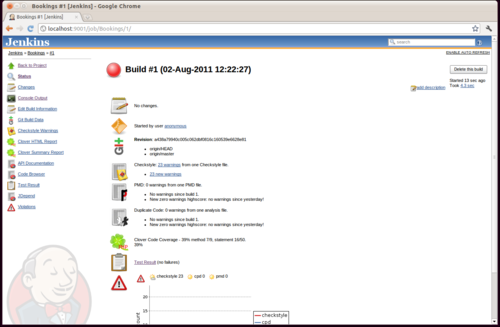
Once the build is complete you can click on the build and take in all the dianostic and code analysis artifacts generated during the build.

Possibly, you may run into an issue building your project from git. A common cause is Jenkins being unable to find a user identity for its operating system user. Please see my post Cannot Build Git Project in Jenkins if this happens to you.

What Next?

Continuous integration isn't about pretty graphs and pithy build summaries. It's about maintaining working software and highlighting issues as soon as possible. Jenkins has a wealth of plugins that help this process, but perhaps the first one to checkout is the email functionality, letting your development team know immediately if something is broken.

Text

Once you have Jenkins up and running you can manage most administrative tasks with a handy cli jar file or by using simple http requests.

Assuming you're running your server on port 8080, obtain the cli jar file like this:

$ wget http://localhost:8080/jnlpJars/jenkins-cli.jar
  

To see a list of available commands simply run the tool with the help argument:

$ java -jar jenkins-cli.jar -s http://localhost:8080 help
  > build
  >   Builds a job, and optionally waits until its completion.
  > clear-queue
  >   Clears the build queue
  > connect-node
  >   Reconnect to a node
  > copy-job
  >   Copies a job
  > ...
  

In recent versions of Jenkins, typical server operations have been decoupled from the cli tool and are now issued using simple http requests. For example to reload Jenkins instance's configuration, you would just fire a http request at it like this:

$ curl http://localhost:8080/reload
  

There are three commands of this sort:

  • reload Reload server configuration
  • restart Restart the server
  • exit Close the server down

Issue these in the format:

$ curl http://[jenkins-server]/[command]
  
Tags: jenkins cli
Text

I just wanted to write up a quick tutorial for installing Jenkins CI on modern flavours of Ubuntu.

There's two options, you can download a pre-prepped specific package and install using aptitude or synaptic, _or_ you can set-up an update site to ensure you're always notified of updates.

I prefer the latter and used the following steps:

$ wget -q -O - http://pkg.jenkins-ci.org/debian/jenkins-ci.org.key | sudo apt-key add -
  $ sudo echo 'deb http://pkg.jenkins-ci.org/debian binary/' >> /etc/apt/sources.list
  $ sudo apt-get update
  $ sudo apt-get install jenkins
  

By default, the Jenkins packages attempt to start up a java web container running on port 8080. To change this, open up /etc/default/jenkins and look for the following:

# port for HTTP connector (default 8080; disable with -1)
  HTTP_PORT=8080
  

Change the port number to whatever works for you and (re)start the service

$ sudo service jenkins restart
  
Tags: jenkins
Text

Just had to 'reblog' this, as of all the caching quirks in Magento, I have binned the most time on account of this one.

magento-quickies:

When you’re creating custom Magento models, it’s common to to add and remove fields to and from a database table during development before finalizing a set of columns for the setup resource/migration file. One thing to keep in mind while you’re doing this is that Magento will cache the list of table columns each model knows about, which means a cache clearing will be needed after adding a column.

Text

Over the past couple of months one of my clients started noticing backups were taking a long time and the size of the resulting backups was becoming an issue. To help identify exceptionally large tables I made use of MySQL's INFORMATION_SCHEMA feature and the following query worked very well.

Text

Rsync is probably one of my favourite unix tools, you can use it for backups, for application deployments, for tree comparisons and so on. It's an infinitely flexible and helpful tool.

Another great thing it can do, is resume broken file transfers e.g. from a sftp, scp, http or ftp transfer.

rsync --partial --progress --rsh=ssh localfile [email protected]:/remote/path
  
Text

I've suffered more from this running Eclipse Indigo on a Natty Virtual Machine, but I occasionally get it on my bare metal desktop too. Basically you'll be merrily hacking away and Eclipse will suddenly crash. Hard. It's as if the application window has entered the Bermuda Triangle.

There is some trace though, a hs_* dump file in your home directory. In that file is a message (along with a lot of other verbiage) like this

# Problematic frame:
  # C [libswt-pi-gtk-3659.so+0x3c17e]
  Java_org_eclipse_swt_internal_gtk_OS_GTK_1ACCEL_1LABEL_1GET_1ACCEL_1STRING+0x0
  

Not really helpful but it helped google lead me to a solution. That solution is here: https://bugs.launchpad.net/ubuntu/+source/openjdk-6/+bug/789123 (see comment 18).

To summarise, you basically need to uninstall overlay-scrollbar and liboverlay-scrollbar-0.1-0.

This can be achieved either using the package manager or aptitude

sudo aptitude remove overlay-scrollbar liboverlay-scrollbar-0.1-0
  

This has the added benefit of removing the annoying scrollbars that come with Natty.