Text

I've had this book on my reading list for a little while now and I got through it in a single sitting yesterday so I thought I'd chuck up a quick review for it.

The Grumpy Programmer (actual name Chris Hartjes) amusingly blogs and tweets all things PHP and particularly PHPUnit. When I saw he was publishing this book, I was curious to see how his strident style would stand up to the longer form. Pleasantly, it turns out.

Chris maintains his gruff voice while whirling through the ins and outs of using PHPUnit. I've been using PHPUnit for a long time now and I find that when I am really familiar with a tool, I tend to re/(over)use patterns that have served me well in the past. So while I found I was familiar with much of the material in the book, there are more than a few tidbits here that I picked up. I feel even the most grizzled PHPUnit veteran's testing regime will benefit from a read through.

The book seems aimed at the less experienced which I did find a little surprising given the title. When I think cookbook I tend to think of the weighty O'Reilly tomes. This book though is more like a lengthy tutorial than a cookbook in the O'Reilly style. As a tutorial goes though it excels. It is detailed without being turgid and covers all the major aspects of using PHPUnit that I would expect it to and then some. I found the chapter on Test Doubles (that is mocks, stubs and fakes) to be particularly excellent. The vocabulary surrounding these terms tends to get mixed up and consequently programmers often treat them as the same thing. That leads in my experience, at best, to confusion. And at worst, to poor tests that are difficult to maintain.

As a quick aside, the book is published by LeanPub, who ensure authors receive 90% of the proceeds from their work. I think this is a wonderful initiative. Writing, especially for a programmer is tremendously hard and I like the idea of those that attempt it, and do a good job, get appropriately rewarded for doing so.

So, back to the book. You find peppered throughout the introduction to PHPUnit subtle wisdoms that are hard to argue with. A simple and you would think obvious example, is that of always providing the final argument to assert statements with a description message. This message is displayed when the test fails, helping you quickly identify where the problem lies. Another: writing strictly encapsulated code that eschews static methods and class variables, is (well unsurprisingly) easier to test that code that is constantly mutating global state.

The book is quite short, coming in (at least in my pdf version) at 85 pages. I feel like there is sufficient scope for more content here. Especially for a 'cookbook'. I would have loved to have seen more on using Data Builders for example. The chapter on data providers is great, but I find you often need more fine grained control over your fixtures. Factories and data builders are a couple concepts that once learned, significantly reduce the friction of TDD.

I perhaps would also liked to have seen more in introduction to TDD itself, motivations for it, and perhaps a brief comparison between the two principle TDD xUnit styles. Specifically the Statist TDD and Mockist/London School TDD styles. The former being a test style mainly interested in setting up some state, running a behaviour and checking the end state matches what you expected. The Mockist approach is less interested in observing State and instead is more interested in the messages passed between objects (method calls between collaborators).

Overall I enjoyed the book, and it fills a much needed role in guiding budding PHP TDD practitioners in the use of the most mature tool we have available in PHP. I picked up a few neat new tricks and I suspect many PHP programmers will do the same.

You can buy it now at grumpy-phpunit.com

Text

By now, I'm pretty much used to and accept OSX as a desktop operating system. I remember it being quite a change when I first moved over (from Gentoo linux and Gnome 2). The mouse movement was wonky, I had to overcome years of muscle memory (learning to use the cmd instead of control key), and probably hardest of all, was leaving behind Unix's idea of workspaces and virtual desktops. What I gave up in configurability though, was more than made up for by consistency and stability. Colleagues of mine can attest to the number of expletives launched at an emerge -vuND world that detonated my Gentoo Desktop.

So I'm happy with a less flexible, but attractive, functional and predictable desktop and I think many others feel the same way. It's no real surprise to me then, that OSX has mostly killed off the idea of Linux on the Desktop.

But somewhere that OSX falls severely behind, is its use of a BSD inspired Unix implementation. If you're born and raised on a diet of GNU (file|core)utils, of apt, yum, and portage, heck even sysvinit, OSX's realisation of Unix leaves a lot to be desired.

With considerable effort and some patience though, OSX can be brought to heel. With Iterm2 and Macports you can have a functional GNUlike Unix experience.

I'll go over the minutiae of my Macports setup another time, but generally speaking I replace all the default OSX tools with GNU equivalents and favour /opt/local/bin over everything else. It means I can have one set of configs which work mostly unchanged across Linux and OSX instances.

Macports is pretty good and the folks that contribute to it do a great job. But it does lack the polish that you take for granted with the Linux package managers. Another point to keep in mind is Macports, like Portage and BSD Ports, is a source-code based 'package' manager. When you install something, it is compiled right there and then on your system. When things go wrong, unless you're a competent C programmer (and even then) you're going to have a bad time.

One last thing to remember too, is OSX defaults to a case insensitive (but thankfully case-preserving) HFS filesystem. By default, PHP and php appear as the same thing to HFS.

So the point of this blog is to go over getting PHP running natively with Macports and how we can run an instance of Magento and the Magento Test Automation Framework (TAF).

MySQL

MySQL is probably the easiet part of the whole thing to setup. So let's start there. For reference, the database files are stored under /opt/local/var/db/mysql55.

In Macports MySQL carrys a namespace of sorts by the way of a version suffix (as does PHP). This lets multiple versions of a package be installed side-by-side. The drawback is rather than having a mysql command, you have a mysql55 command. That's annoying. So we will install mysql_select which lets us select a version to activate and give us proper file names.

$ sudo port install mysql55-server mysql55 mysql_select
  $ sudo port select mysql mysql55
  $ sudo port load mysql55-server
  

We will want a database for our magento application.

$ mysqladmin -uroot -p create magento 
  

PHP / PHP-FPM

Now we want to install PHP, PHP-FPM and the extensions Magento and TAF require.

$ sudo port install php54 php54-fpm php54-curl php54-APC php54-gd php54-pcntl php54-gd php54-mcrypt php54-iconv php54-soap php54-yaml php54-xdebug php54-openssl php54-mysql php54-pear php_select pear-PEAR
  
  $ cd /opt/local/etc/php54
  $ cp php-fpm.conf.default php-fpm.conf
  $ cp php.ini-development php.ini
  
  $ sudo vim php.ini
  # set date.timezone and cgi.fix_pathinfo = 0
  
  $ sudo vim php-fpm.conf
  # make any changes for min / max num servers, error logging etc
  

The MySQL extension needs a little bit of prodding to look in the correct location for mysql.sock

echo 'pdo_mysql.default_socket=/opt/local/var/run/mysql55/mysqld.sock' | sudo tee --append /opt/local/var/db/mysql.ini
  

Once PHP-FPM is installed and configured you can use Macports to tell launchd to start it automatically.

$ sudo port load php54-fpm
  

PHP-Select

As with MySQL, Macports lets you install multiple versions of PHP side by side. This can be handy if you want to run PHP 5.3 and PHP 5.4 at the same time. I just install a single version, but Macports effectively namespaces everything. So rather than '/opt/local/bin/php' you have '/opt/local/bin/php54'. PHP Select, which we installed earlier fixes this by effectively 'activating' one version and creating the usual executable names we're accustomed to.

$ sudo port select php php54 
  

PEAR

PEAR is the single biggest pain in the whole process. And with some research it turns out its because Macports PEAR isn't even meant be used by end users (WAT?!).

There is no MacPorts port that installs the pear package manager application with the intent that it be used by the end user outside a MacPorts port install. If you want to use pear manually on your own then you should install it using gopear, composer or some other method. http://trac.macports.org/ticket/37683

So this goes a long way to explaining why Macports doesn't set PEAR up with sane defaults, or even put the pear command in the default path. But we can sort this all out easily enough ourselves.

$ sudo pear config-set php_bin /opt/local/bin/php
  $ sudo pear config-set php_dir /opt/local/lib/php/pear
  $ sudo pear config-set ext_dir /opt/local/lib/php54/extensions/no-debug-non-zts-20100525
  $ sudo pear config-set bin_dir /opt/local/bin
  $ sudo pear config-set cfg_dir /opt/local/lib/php/pear/cfg
  $ sudo pear config-set doc_dir /opt/local/lib/php/pear/docs
  $ sudo pear config-set www_dir /opt/local/lib/php/pear/www
  $ sudo pear config-set test_dir /opt/local/lib/php/pear/tests
  $ sudo pear config-set data_dir /opt/local/lib/php/pear/data
  $ echo 'PATH=$PATH:/opt/local/lib/php/pear/bin' >> ~/.bashrc # or zshrc if you use zsh
  

Another issue you'll possibly have with PEAR, is it will default to the system PHP executable (/usr/bin/php) rather than your active Macports one. The pear command does test for an environment variable so we can set up an alias to pass this variable to pear on invocation.

Add an alias to your bashrc/zshrc in the form:

alias pear='PHP_PEAR_PHP_BIN=php pear'
  

Reload your bashrc/zshrc.

$ source .bashrc (or source .zshrc)
  

Now the alias is active we can check that it's working

$ /opt/local/lib/php/pear/bin/pear version
  PEAR Version: 1.9.4
  PHP Version: 5.3.15
  Zend Engine Version: 2.3.0
  Running on: Darwin avalanche 12.2.0 Darwin Kernel Version 12.2.0: Sat Aug 25 00:48:52 PDT 2012; root:xnu-2050.18.24~1/RELEASE_X86_64 x86_64
  
  $ pear version
  PEAR Version: 1.9.4
  PHP Version: 5.4.12
  Zend Engine Version: 2.4.0
  Running on: Darwin avalanche 12.2.0 Darwin Kernel Version 12.2.0: Sat Aug 25 00:48:52 PDT 2012; root:xnu-2050.18.24~1/RELEASE_X86_64 x86_64
  

Now to make installing PEAR packages easier I turn the channel autodiscovery option on, which means you don't have to manually add channels for package dependencies (which there are a lot when installing phing or phpunit…)

$ sudo pear config-set auto_discover 1
  

Now add phing and phpunit and install them with all their optional dependencies and some extra packages for the Magento TAF.

$ sudo pear channel-discover pear.phing.info
  $ sudo pear channel-discover pear.phpunit.de
  $ sudo pear channel-discover pear.symfony-project.com
  $ sudo pear install --alldeps phing/phing 
  $ sudo pear install --alldeps phpunit/phpunit
  $ sudo pear install phpunit/PHP_Invoker
  $ sudo pear install phpunit/PHPUnit_Selenium
  $ sudo pear install -f symfony/YAML
  

PECL/Extensions

Macports by default creates .ini files to load extensions in /opt/local/var/db/php54. If you manually build any extensions, add the appropriate ini file here, for example:

$ echo 'extension=yaml.so' | sudo tee /opt/local/var/db/php54/yaml.ini
  

Nginx

Apache/Nginx. It doesn't really matter. Both are great, but in production I use Nginx so I use it in development too. I install it with just the ssl extension enabled, to see the full range of available options, use:

$ sudo port variants nginx 
  

To install:

$ sudo port install nginx +ssl
  $ cd /opt/local/etc/nginx
  $ sudo cp fastcgi.conf.default fastcgi.conf
  $ sudo cp fastcgi_params.default fastcgi_params
  $ sudo cp mime.types.default mime.types
  $ sudo cp nginx.conf.default nginx.conf
  $ sudo mkdir conf.d sites-available sites-enabled ssl
  

Once installed, Nginx requires a little bit of work to hook up to PHP and particularly to work well with Magento.

$ sudo vim nginx.conf  
  # Insert the following towards the bottom of the file (but inside the http block) 
  map $scheme $fastcgi_https {
     default off;
     https on;
  }
  
  ##
  # Virtual Host Configs
  ##
  include conf.d/*.conf;
  include sites-enabled/*;
  

For each app just add a server block to sites-available, then symlink it to sites-enabled.

$ sudo vim sites-available/magento.dev.conf
  # ...     
  $ cd sites-enabled
  $ sudo ln -s ../sites-available/magento.dev.conf 001-magento.dev.conf
  

This is the server block definition I use for magento development, feel free to modify it for your needs.

server {
      listen 80;
      listen 443 ssl;
  
      ssl_certificate     ssl/magento.dev.crt;
      ssl_certificate_key ssl/magento.dev.key;
  
      server_name magento.dev;
      root /Users/aaron/Sites/magento;
  
      location / {
          index index.html index.php; ## Allow a static html file to be shown first
          try_files $uri $uri/ @handler; ## If missing pass the URI to Magento's front handler
          expires 30d; ## Assume all files are cachable
      }
  
      ## These locations would be hidden by .htaccess normally
      location /app/                { deny all; }
      location /includes/           { deny all; }
      location /lib/                { deny all; }
      location /media/downloadable/ { deny all; }
      location /pkginfo/            { deny all; }
      location /report/config.xml   { deny all; }
      location /var/                { deny all; }
      location /shell/              { deny all; }
  
      ## Disable .htaccess and other hidden files
      location ~ /\. {
          deny all;
          access_log off;
          log_not_found off;
      }
  
      location ~ \.php$ { ## Execute PHP scripts
          if (!-e $request_filename) { rewrite / /index.php last; } ## Catch 404s that try_files miss
  
          expires        off; ## Do not cache dynamic content
          fastcgi_intercept_errors on;
          fastcgi_pass   127.0.0.1:9000;
          fastcgi_param  HTTPS $fastcgi_https;
          fastcgi_param  SCRIPT_FILENAME  $document_root$fastcgi_script_name;
          fastcgi_param  MAGE_RUN_CODE default; ## Store code is defined in administration > Configuration > Manage Stores
          fastcgi_param  MAGE_RUN_TYPE store;
          proxy_read_timeout 120;
          proxy_connect_timeout 120;
          include        fastcgi_params; ## See /etc/nginx/fastcgi_params
      }
  
      location @handler { ## Magento uses a common front handler
          rewrite / /index.php;
      }
  }
  

We've said our application lives on a server called 'magento.dev'. So let's tell our hosts file about that.

$ vim /etc/hosts
  # Insert or append to an existing line
  # 127.0.0.1 localhost magento.dev
  

Last thing that needs to be done is setting up a selfsigned ssl certificate / key pair and storing them under /opt/local/etc/nginx/ssl

$ openssl req -x509 -nodes -days 365 -newkey rsa:2048 -keyout myserver.key -out myserver.crt
  $ sudo mv myserver.key /opt/local/etc/nginx/etc/ssl/magento.dev.key
  $ sudo mv myserver.crt /opt/local/etc/nginx/etc/ssl/magento.dev.crt
  

Once that's done, we can start nginx.

$ sudo port load nginx
  

Web App Directory Config

I keep my web apps living under /Users/aaron/Sites, but remember that every directory element in the path needs to have the executable bit set for all users (so the web server can traverse the directory tree). Literally this is a case of:

$ chmod a+x /Users/aaron && chmod a+x /Users/aaron/Sites
  

Install Magento and TAF

N98 Magerun is the coolest thing to happen to Magento development since well, I can't remember. It singlehandedly relegated a few thousand lines of cobbled together bash script to the bin.

$ cd /Users/aaron/Sites
  $ curl -O magerun.phar https://github.com/netz98/n98-magerun/raw/master/n98-magerun.phar
  $ chmod a+x magerun.phar
  $ ./magerun.phar install
  # Follow the directions and install to /Users/aaron/Sites/magento with base url http://magento.dev and database name 'magento'.
  

After all that work, hitting http://magento.dev should now bring up the magento demo store!

I've been playing with Magento's Test Automation Framework and it was the motivation for finally getting everything working properly natively.

TAF runs at a glacial pace and in my normal development environment (VirtualBox over NFS), the universe would have undergone heat death long before the TAF suite completed its running.

Unfortunately the documentation for TAF is a bit of a mess (I'll write about my experience with it soon), but what it offers - 1500 automated tests - is a pretty big attraction.

Installation is actually pretty easy. I am assuming you don't have git already installed (remember you can use port variants to see what extension options are available):

$ sudo port install git-core +bash_completion +credential_osxkeychain +doc +pcre +python27
  $ sudo port install git-extras
  $ cd /Users/aaron/Sites
  $ git clone https://github.com/magento/taf taf
  $ cd taf # /Users/aaron/Sites/taf
  $ cp phpunit.xml.dist phpunit.xml
  $ cp config/config.yml.dist config/config.yml
  $ cd .. # /Users/aaron/Sites
  $ curl -O selenium-server.jar http://selenium.googlecode.com/files/selenium-server-standalone-2.31.0.jar
  

To run the test suite open up a new terminal

$ cd /Users/aaron/Sites
  $ java -jar selenium-server.jar
  

Now the test suite is good to go

$ cd /Users/aaron/Sites/taf
  $ ./runtests.sh
  

The test suite takes a loooooong time, so go for a run or something.

Hopefully these steps help out other PHP developers suffering from OSX.

Text

The PHP Mysql port is a little bit of a pain. By default Macports doesn't set a default mysql sock. That leads to an error something like this:

SQLSTATE[HY000] [2002] No such file or directory.
  

You fix it by just appending the sock file for the mysql version you're using into the PHP mysql.ini file. I use mysql55 so to fix PHP I do this

echo 'pdo_mysql.default_socket=/opt/local/var/run/mysql55/mysqld.sock' | sudo tee /opt/local/var/db/mysql.ini
  
Text

There are only two hard things in Computer Science: cache invalidation and naming things.

-- Phil Karlton

I wanted to grab the last bit of a url that I knew would be the name of an image. I knew strstr well but that operates by giving you the remainder of a string that occurs after some needle in a string haystack. I wanted this behaviour, but only from the last instance of the needle.

strstr — Returns part of haystack string starting from and including the first occurrence of needle to the end of haystack.

strrchr -This function returns the portion of haystack which starts at the last occurrence of needle and goes until the end of haystack.

Let's look at how these work with an example

$url = 'http://www.google.com/a/b/c/d,img';
  echo strrchr($url, '/'); // prints /d.img  
  echo strstr($url, '/');   // prints //www.google.com/a/b/c/d.img
  

Now I've been programming in PHP for pushing on 12 years and this one still did my head in. The names of two very similar behaving functions bare little resemblance to each other.

At this point the arguments and criticisms over the core API have been exhausted and there's little that can/will be done. But I do wonder if it would be worth creating an object library to encapsulate primitive functions such as String, Integer, Array, Float etc., I'm not sure how possible auto-boxing is with PHP, and indeed if it's even a good idea. But definitely some object wrappers would help ease this API pain.

Tags: php wtf
Text

Embrace change

It has been an exciting time to be a PHP Developer these past twelve months, PHP 5.3 is now rock solid and PHP 5.4 is getting there. Both releases significantly modernise elements of the language, closing the gap between PHP and the offerings of more 'in vogue' languages.

In technology we often see change happen in sudden, explosive steps. Often it seems to coincide with developments a technology's ecosystem or among its competitors. For PHP the first major kick was the rapid rise in popularity of Object Oriented Programming in the early 00s. This led to PHP 5's radically overhauled OO implementation in 2004. The next kick, I feel, came in 2005 when Ruby on Rails exploded into everyone's consciousness. RoR provided a full stack web development platform that drastically simplified creating complex web applications. The PHP community responded in kind with a number of 'fullfat' Model View Controller (MVC) Frameworks, the most successful being Zend's and Symfony.

It all depends

The arrival of PHP 5.3 and features like Namespaces, PHAR, Closures and the ubiquity of Github is having the effect of giving PHP a new kick, and the results are starting to make themselves felt. We now have second generation frameworks from Zend and Symfony leveraging these technologies.

One problem remains though, and that is managing and distributing dependencies. Modern web development platforms all now have robust dependency management tools available and in the PHP camp, PEAR wasn't really cutting it.

The success of Symfony2 in particular, with its emphasis on high quality, modular components, forced PHP developers to address how they bundled and distributed library code.

Luckily for us, the guys behind Composer, (again, taking considerable cues from the Ruby community) have licked it. Composer, in tandem with Symfony2 components allow PHP Developers to confidently build on top of other developers' libraries.

Do we really need another packaging tool?

Why did we need another package and dependency management tool anyway? What really, is wrong with PEAR? Well, if we wind the clock way back to 1999 when Netscape Communicator was still the most popular web browser and Google had just moved out of Susan Wojcicki's garage, PEAR was conceived as PHP's answer to PERL's CPAN. Despite some strident efforts, it never really managed to become the most pleasant package manager to work with: rigid, elitist and worst of all, difficult for end-users. PEAR's age strictly speaking is not the problem, but its centralised nature is a bottleneck and there is no straightforward way to handle two packages with varying dependencies. For example: say package x, requires stable package y. Package z requires beta package y. You can't install both. Dependency and package management has moved on a long way since 1999.

PHP packaging has been broken for a long time

Over time PEAR's shortcomings have led to a graveyard of abandoned packages, code of at best variable and at worst, dubious, quality, and a community lacking in any sort of dynamism. If you make something easy, people will use it. PEAR is difficult to use for developers and users alike.

Composer democratises (in the best sense) things and puts full control of dependencies in the hands of library developers. Free to pick and chose code they want to use. Free from having to worry about navigating the PEAR jungle. Here the rise and rise of Github has been key. Composer can sit over the top of code distribution services provided by Github, or it can use its default Packagist repository. This removes the need for libraries to live in a blessed canonical repository or for developers to host it themselves.

... profit?

There's no compelling need now to constantly rewrite basic library components (I think we've finally licked what ought to be the basic issue of class loading!), Free of the shackles of PEAR, we are witnessing an explosion of high quality PHP frameworks, libraries and utilities.

PHPSpec, Behat, Twig, Mockery, Doctrine, are just a few that immediately spring to mind. Some (such as Doctrine) have been around a while. However the advances PHP 5.3 brought to the table have significantly helped improve the utility of these projects.

Anyway, so (after a fashion) I come to the tool that motivated me to write this post, n98-magerun.

The name is horrible, but the tool itself is brilliant. In short, it's Drush for Magento and it's wonderful. It is one of those tools that makes you wonder what on earth you did before it.

I have a folder full of bash scripts, cobbled together to help automate the mind-numbing process of managing Magento installations. Over the course of a few months Christian Münch and friends have overseen a small tool quickly develop into the kind of utility we've all wanted but never had the time/patience to build ourselves.

Magerun is elegantly simple for the user, and cleanly extendable by developers. It is a perfect illustration of why it's such a great time to be a PHP developer. Better dependency management, easy distribution, modular libraries and powerful language syntax have all came together to let someone with an itch, scratch it quickly and effectively.

It has become several orders of magnitude easier to develop, package and distribute PHP libraries and utilities. The result of this leap forward is a brilliant tool that helps Magento developers dramatically increase their productivity.

Text

TL;DR Basically it is all Google's fault.

We've seen some pretty epic PHP rants this year, probably the most famous among them are PHP a Fractal of Bad Design, and Jeff Atwood's latest (in what seems to be a biennial broadside) The PHP Singularity.

The common thread in these rants is incredulity that anyone would, in 2012, write new code in PHP. There's a lot of reasons why someone might write greenfield PHP code in 2012. But equally (and this is said as a decade long PHP programmer) I have to admit that plenty of the criticisms levelled at PHP are valid. Yet, for the most part they just don't, particularly, matter.

One criticism that is wholly invalid yet comes up time and time again, is that using PHP intrinsically leads to bad code. I don't feel this is an inherent trait of PHP itself, so much symptomatic of the popularity and low barrier to entry of PHP. Basically there's more examples of bad code out there compared to pretty much any other platform because there's simply more code out there, written by programmers of wildly varying skill. The other problem, is that PHP came into existence as a scratch to a C programmer's itch. PHP was developed at a time where people still actually wrote web applications in C and where the stateless nature of HTTP was relatively respected. PHP, like the web itself, has moved on dramatically since then.

A modern PHP 5.4 webapp looks about as similar to an early 00s PHP 4 webapp as Scala does to Java. Yet many critics when slating the language appear to be code archeologists, excavating pre-historic practices that went out of favour long-ago.

This can be partially forgiven, because owing to the age of the language there's plenty of out of date information out there with high rankings in Google. The ubiquitous w3schools is an unfortunate example of bad practices coming well ahead of sites with more modern approaches to solving problems in PHP.

So 'New PHP' is very different to 'Old PHP'. But the 'Old PHP' is what most people seem to find when searching in Google and this confuses people.

We see this manifested in blogs like Will Rails become the new PHP. This blog has a number of spectacular shortcomings, most egregiously the author's horribly naive view of the PHP community, but the interesting one is his ignorance of the power of Google.

There's plenty of support out there for budding PHP programmers, whether on the web, on forums, or IRC. There are countless, well attended, supported and growing conferences, meetups and the like for PHP programmers. One thing that a community cannot do, is force Google to nuke w3schools' PageRank. Which means that brilliant efforts like PHP The Right Way get swamped by old, incorrect and at times dangerous dreck.

And what the 'Will Rails become the new PHP' author perhaps hasn't realised, is Rails, at least in the terms he's trying to couch it, has already become the 'New PHP'. I am a novice Rails developer, I like to hack around in it as it can be quite fun to spike out solutions. What I've been struck by, is the sheer amount of bad advice out there. Advice novices will come across, if they turn to Google for help.

If you're well versed in a platform you learn through brutal experience what works, what doesn't and your nose is finely tuned to bullshit. When I read a PHP article I know instinctively if what I am reading is reliable. But with Rails, as a novice, I don't quite have that sense, beyond my own background experience with other programming languages.

So let's look at an example. I've been working on a dead simple Rails authentication webservice. It listens for HTTP requests for /login, /logout, /session, etc., and emits either XML or JSON in response. I'm using the respond_to method to serve out these responses. Unfortunately what I found is if I request a route that does not exist, I get an HTML error back. This doesn't make a lot of sense for a webservice that otherwise speaks XML and JSON.

Other global exceptions similarly respond with HTML. I don't want to wrap every action up in a begin/rescue block and there is certainly no way to intercept router exceptions in actions anyway. So I needed to learn how to catch global exceptions.

In my journey of (Google) discovery I came across this blog post and appeared to hit paydirt. The advice appears to be legit, hell someone in the rails community even featured it in a podcast. So on the face of it this seems good. But that switch statement sure is smelly. Does it, really, need to be this hard?

Now my general purpose programming brain recognised that this code while solving my problem, is not ideal. And why is it not ideal? This one method sure has a lot of responsibility. Method names with plurals in them are usually a code smell. Over time as more specific exceptions need to be handled I would end up with code that is as easy to read as Goethe's Faust, photocopied and in the original Gothic script (not easy). What we have here is a God Method in training.

Now, what if I am a Ruby/Rails/Programming novice? I have got plenty of other stuff to learn, I'm going to go right here and Cargo Cult this code into my webapp and move on. Just like all the rookie PHP coders do, right?

Well, I didn't do that. I saw that this rescue_from method was pretty awesome and so I went to the Rails API docs to look it up.

API docs for any language are pretty terse, but what jumped out at me was this line:

“Handlers are inherited. They are searched from right to left, from bottom to top, and up the hierarchy. The handler of the first class for which exception.is_a?(klass) holds true is the one invoked, if any.”
  

This isn't great documentation admittedly, but it means basically, if you put rescue_from Exception at the bottom of the list of rescue_from handlers in your application_controller.rb file, then since everything derives from Exception, nothing else will get a look in (Rails will look at the handlers from the bottom up).The author of that helpful blog we found didn't realise this, and so his solution was needlessly complicated.

What can we learn from this? Well Rails programmers certainly live in a glass house and shouldn't throw stones is one thing. But on a slightly less trollish note, there is a problem here for all novice programmers that turn to Google to help them solve problems. The answers on Google are usually either wrong, or at best, incomplete. As the web gets older, bad and out of date advice piles up making it much harder for novices to find good advice.

Knocking a language for this phenomenon (or a framework, seriously, whatever) is more than a little ignorant and doesn't solve the problem. Efforts like PHP The Right Way is how PHP is trying to fix it. If Rails really doesn't want to be the 'Old PHP', they need to realise it's less to do with languages and platforms, and more about SEO.

Text

Twig is a PHP implementation of Jinja2, a python templating engine. Unfortunately there's no specific syntax highlighting support for .twig files in Vim. But that's no real problem as you can use the htmljinja syntax file provided here: http://www.vim.org/scripts/script.php?script_id=1856

To map it to twig, edit vimrc and add:

au BufRead,BufNewFile *.twig set filetype=htmljinja
  
Tags: php twig vim jinja
Text

If you have a slightly dated PHPUnit test-case suite, and like me, have recently reinstalled your OS you will likely be running a modern version of PHPUnit (3.5/3.6).

Keeping up with changes to PHPUnit's suite of extensions can be occasionally dizzying, things have been put in and then ripped out of the core quite frequently in the last few releases. A common problem I'm seeing lately upgrading my test-suites to be 3.6 compatible, is the extraction of database testing classes to their own package on the pear.phpunit.de channel.

If you see an error like this:

> include(PHPUnit/Extensions/Database/TestCase.php): failed to open stream: No such file or directory
  

Odds are you need to do this:

$ sudo pear config-set auto_discover 1
  $ sudo pear install --alldeps pear.phpunit.de/DbUnit
  
Text

Running a continuous integration process where you generate all your build artefacts on every build will push you to look for speed optimisations.

With an application I am currently configuring for Jenkins, it was taking about 30-35 minutes to generate all the API documentation through PHPDocumentor. I had heard good things about DocBlox - must notably its speed - and it's used by the Zend Framework so I thought I'd sub it in for PHPDocumentor and see if it was quicker.

Installation

DocBlox has a number of dependencies which we also need to install if they are not already.

Use your system's package manager to install the xsl php extension and graphviz.

$ sudo aptitude install php5-xsl
  $ sudo aptitude install graphviz
  

To install DocBlox and PHP-Markdown use PEAR.

$ sudo pear channel-discover pear.michelf.com
  $ sudo pear channel-discover pear.docblox-project.org
  $ sudo pear install --alldeps channel://pear.docblox-project.org/DocBlox-0.13.1
  

How Fast?

DocBlox uses largely the same command line options as phpdoc, so it can act as a drop in replacement if you already have existing build scripts utilising phpdoc.

In terms of speed, well, it's very fast. That 35 minute phpdoc run took just 43 seconds in DocBlox.

Text

I want to look at how to get a very simple PHP project setup in Jenkins using the standard suite of tools and templates as demonstrated on php-jenkins.org.

If you do not have Jenkins installed or are not sure you have your environment setup correctly, please checkout my previous tutorial Getting Started With Jenkins for PHP.

A quick checklist

Before we start, make sure you have your environment and Jenkins installation up and running and appropriately configured.

  • You have a JVM and Jenkins installed running at http://localhost:8080
  • You have the following Jenkins plugins installed
    • checkstyle
    • cloverphp
    • dry
    • htmlpublisher
    • jdepend
    • plot
    • pmd
    • violations
    • xunit
  • You have the following PEAR packages installed
    • pdepend/PHP_Depend
    • phpmd/PHP_PMD
    • phpunit/phpcpd
    • phpunit/phploc
    • PHPDocumentor
    • PHP_CodeSniffer
    • phpunit/PHP_CodeBrowser
    • phpunit/PHPUnit
    • phpunit/ppw
  • You have Ant installed
  • You have Git installed and are familiar with its basic use
  • You have the Zend_Framework installed globally as a PEAR package

If you don't have the above installed please refer to the Getting Started With Jenkins for PHP tutorial.

If you're not familar with Git, have a quick read of git-scm.org or refer to my Git cheatsheet.

To install the Zend Framework as a PEAR package see my post on Installing Zend Framework from PEAR.

Create your project

I'm basing this tutorial on a sample Zend Freamework application, you're free to use whatever codebase you like. But for the purposes of this tutorial I'm using this project as a starting point: [email protected]:ajbonner/Bookings.git.

$ git clone https://github.com/ajbonner/Bookings.git ./bookings
  $ cd bookings
  $ ppw --name 'Bookings' --source ./application .
  

This will generate an ant build file with some general defaults for PHP_CodeSniffer and PHP Mess Detector along with a standard phpunit configuration file.

First thing, we'll need to make a small amendment to the phpunit configuration file, since we're testing a Zend Framework application, we need to make sure PHPUnit loads a custom bootstrap before running tests. Open up the generated phpunit.xml.dist file and change the opening phpunit element to look like this:

<phpunit backupGlobals="false"
                backupStaticAttributes="false"
                strict="true"
                verbose="true"
                colors="true"
                bootstrap="tests/bootstrap.php">
  

Our build environment is now configured correctly to run Zend Framework Test Cases, we have our ant build file setup and some defaults configured for our code coverage and analysis tools. Let's add our new build and phpunit configuration files to git and commit our changes. Then we can run ant and see what happens.

$ git add build.xml phpunit.xml.dist
  $ git commit -m 'Add build and test configuration files'
  $ ant
  >> Buildfile: /home/aaron/Sites/Bookings/build.xml
  >> clean:
  >>    [delete] Deleting directory /home/aaron/Sites/Bookings/build/api
  >>    [delete] Deleting directory /home/aaron/Sites/Bookings/build/code-browser
  >>    [delete] Deleting directory /home/aaron/Sites/Bookings/build/coverage
  >>    [delete] Deleting directory /home/aaron/Sites/Bookings/build/logs
  >>    [delete] Deleting directory /home/aaron/Sites/Bookings/build/pdepend
  >>     [mkdir] Created dir: /home/aaron/Sites/Bookings/build/api
  >>     [mkdir] Created dir: /home/aaron/Sites/Bookings/build/code-browser
  >>     [mkdir] Created dir: /home/aaron/Sites/Bookings/build/coverage
  >>     [mkdir] Created dir: /home/aaron/Sites/Bookings/build/logs
  >>     [mkdir] Created dir: /home/aaron/Sites/Bookings/build/pdepend
  >> 
  >> parallelTasks:
  >> 
  >> phpcpd:
  >> 
  >> pdepend:
  >>      [exec] PHP_Depend 0.10.5 by Manuel Pichler
  >>      [exec] 
  >>      [exec] Parsing source files:
  >>      [exec] ....                                                             4
  >>      [exec] 
  >>      [exec] Executing Coupling-Analyzer:
  >>      [exec]                                                                 18
  >>      [exec] 
  >>      [exec] Executing CyclomaticComplexity-Analyzer:
  >>      [exec] .                                                               24
  >>      [exec] 
  >>      [exec] Executing Dependency-Analyzer:
  >>      [exec]                                                                 17
  >>      [exec] 
  >>      [exec] Executing Inheritance-Analyzer:
  >>      [exec]                                                                  5
  >>      [exec] 
  >>      [exec] Executing NodeCount-Analyzer:
  >>      [exec]                                                                 14
  >>      [exec] 
  >>      [exec] Executing NodeLoc-Analyzer:
  >>      [exec] phpcpd 1.3.2 by Sebastian Bergmann.
  >>      [exec] 
  >>      [exec] 0.00% duplicated lines out of 119 total lines of code.
  >>      [exec] 
  >>      [exec] Time: 0 seconds, Memory: 2.75Mb
  >>      [exec] .                                                               22
  >>      [exec] 
  >>      [exec] Generating pdepend log files, this may take a moment.
  >>      [exec] 
  >>      [exec] Time: 00:00; Memory: 9.50Mb
  >> 
  >> phpcs:
  >> 
  >> phpmd:
  >>      [exec] Result: 1
  >> 
  >> phploc:
  >>      [exec] phploc 1.6.1 by Sebastian Bergmann.
  >>      [exec] 
  >>      [exec] Directories:                                          1
  >>      [exec] Files:                                                4
  >>      [exec] 
  >>      [exec] Lines of Code (LOC):                                119
  >>      [exec]   Cyclomatic Complexity / Lines of Code:           0.08
  >>      [exec] Comment Lines of Code (CLOC):                        18
  >>      [exec] Non-Comment Lines of Code (NCLOC):                  101
  >>      [exec] 
  >>      [exec] Namespaces:                                           0
  >>      [exec] Interfaces:                                           0
  >>      [exec] Classes:                                              4
  >>      [exec]   Abstract:                                           0 (0.00%)
  >>      [exec]   Concrete:                                           4 (100.00%)
  >>      [exec]   Average Class Length (NCLOC):                      22
  >>      [exec] Methods:                                              9
  >>      [exec]   Scope:
  >>      [exec]     Non-Static:                                       9 (100.00%)
  >>      [exec]     Static:                                           0 (0.00%)
  >>      [exec]   Visibility:
  >>      [exec]     Public:                                           8 (88.89%)
  >>      [exec]     Non-Public:                                       1 (11.11%)
  >>      [exec]   Average Method Length (NCLOC):                     10
  >>      [exec]   Cyclomatic Complexity / Number of Methods:       1.89
  >>      [exec] 
  >>      [exec] Anonymous Functions:                                  0
  >>      [exec] Functions:                                            0
  >>      [exec] 
  >>      [exec] Constants:                                            0
  >>      [exec]   Global constants:                                   0
  >>      [exec]   Class constants:                                    0
  >> 
  >> phpunit:
  >>      [exec] PHPUnit 3.5.14 by Sebastian Bergmann.
  >>      [exec] 
  >>      [exec] ...
  >>      [exec] .
  >>      [exec] 
  >>      [exec] Time: 1 second, Memory: 19.25Mb
  >>      [exec] 
  >>             OK (4 tests, 16 assertions)
  >> 
  >>      [exec] Writing code coverage data to XML file, this may take a moment.
  >>      [exec] 
  >>      [exec] Generating code coverage report, this may take a moment.
  >> 
  >> phpcb:
  >> 
  >> build:
  >> 
  >> BUILD SUCCESSFUL
  >> Total time: 3 seconds
  >> 
  

If you have everything setup correctly you will have a build directory with a number of artifacts: code coverage analysis, code style reports, dependency analysis, etc. You can look at these directly but it's much more convienient to use Jenkins to view these artifacts.

Importing a Project into Jenkins

We have a working build and we are producing a number of artifacts representing certain aspects of our software. Time now to import the project into Jenkins and have this process ran automatically.

Step 1 - Create a New Jenkins Project

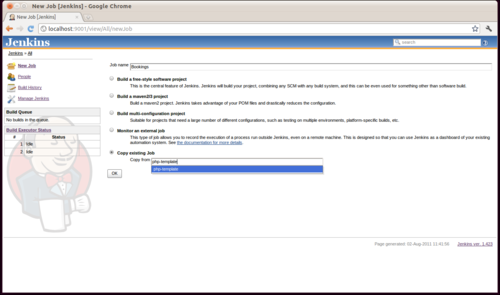
As part of getting our environment ready for Jenkins, we installed a PHP Project Template. To create our new Project, we copy this template, and give our project a name. Choose whatever you like, but for the purposes of this tutorial, I've chosen 'Bookings'.

Step 2 - Configure your New Project

You're now presented with a (at first glance) daunting configuration page. We'll work our way down the page, for the most part we don't need to make major changes.

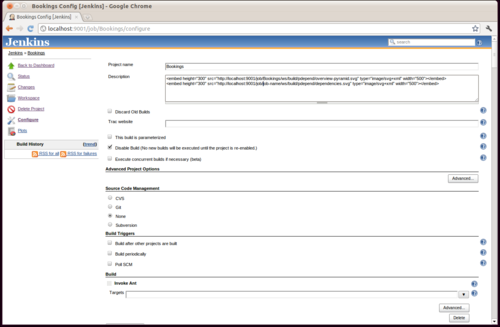
Firstly the pdepend task generates a pair of SVG images, in order to have these display on the project dashboard we need to substitute 'job-name' to 'Bookings' (or whatever you chose for your project name) in the embed tags in the description field.

Next, uncheck 'disable build', naturally we want to perform builds!

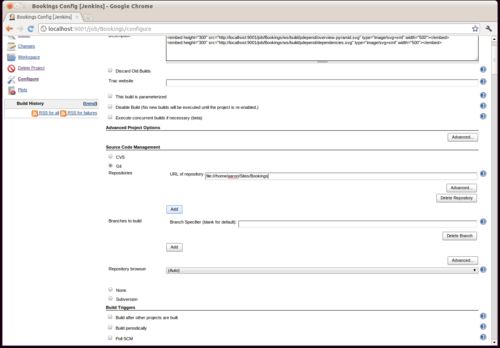
The project will be retrieved from the git repository we created during the initial build configuration. Pass in the absolute filesystem path to your repository, for example mine is file:///home/aaron/Sites/Bookings.

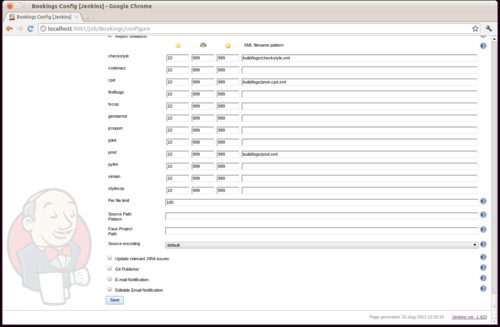
That's it. You now have setup the project in Jenkins and defined a source. The remaining details can be left at their defaults. Scroll down to the bottom of the page and click the save button.

Step 3 - Build the Project

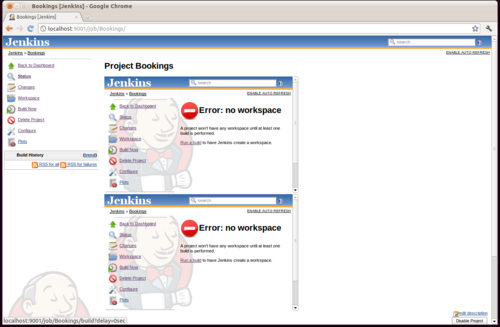
The project needs to first do a build before the project workspace can be initialised. On the left hand project menu is a 'build now' link. Click that and Jenkins will checkout a copy of our project from git then process the ant build.xml we defined.

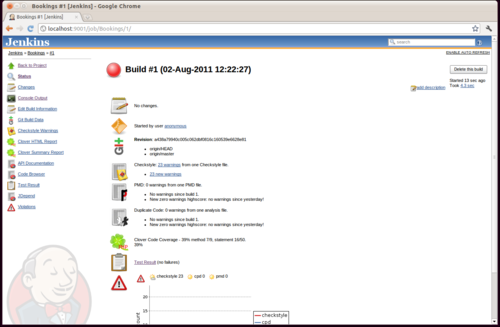
Once the build is complete you can click on the build and take in all the dianostic and code analysis artifacts generated during the build.

Possibly, you may run into an issue building your project from git. A common cause is Jenkins being unable to find a user identity for its operating system user. Please see my post Cannot Build Git Project in Jenkins if this happens to you.

What Next?

Continuous integration isn't about pretty graphs and pithy build summaries. It's about maintaining working software and highlighting issues as soon as possible. Jenkins has a wealth of plugins that help this process, but perhaps the first one to checkout is the email functionality, letting your development team know immediately if something is broken.

Text

Quick example on how to easily send a file using Zend Framework's Zend_Mail class.

Text

Foolishly, when working on a recent gateway implementation (usaepay) I wrote a custom logging function to keep track of what was happening.

Turns out there's already something there to do it

Mage_Payment_Method_Abstract::_debug($data);
  

If you want to call it from outside the payment_method inheritance tree use

Mage_Payment_Method_Abstract::debugData($data);
  

In both cases your payment method needs to have its debug config setting enabled e.g. for my usaepay module

echo Mage::getStoreConfig('payment/usaepay/debug'); 
  >> 1
  
Tags: magento php
Text

It's very simple right now to get the milestone builds of the PHP Developer Tools (PDT) 3 up and running (and a significant improvement on the current Helios SR2 release).

Pull down the 'classic' version Eclipse 3.7 Indigo from http://www.eclipse.org/downloads/ and install.

Once installed, launch Eclipse and navigate to Help->Install new Software.

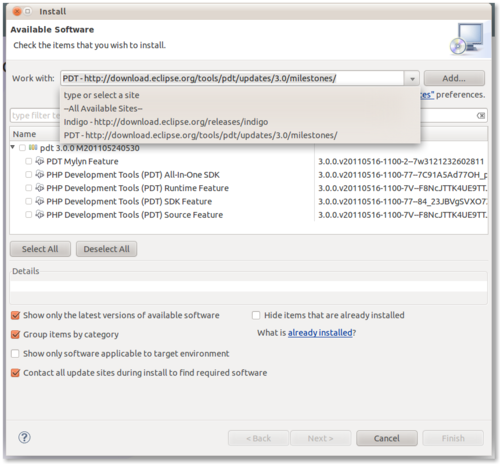
Add the Indigo update site 'http://download.eclipse.org/releases/indigo'. This will take sometime to add, let it go for 5 or so minutes.

UPDATE 20/10/2011 The following step is no longer required as the the PDT 3.0 series is now in the main indigo update repository. Once the Indigo Update Site is added, add the PDT 3.0 Update Site http://download.eclipse.org/tools/pdt/updates/3.0/milestones/

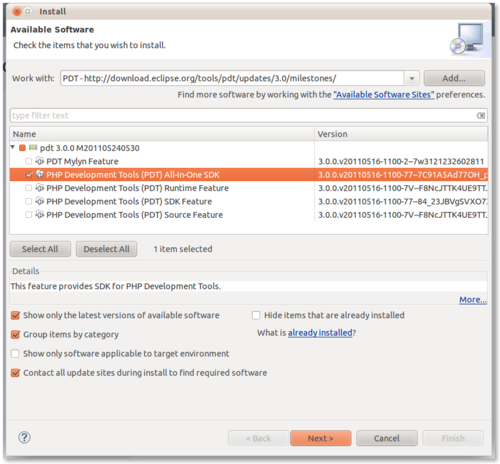
Now, to install simply select PDT Development Tools All in One SDK (leave the others unselected) and click next. The installation process shouldn't take more than a few minutes. .

Text

Working with PHP websites you’ll regularly need to export/import copies of MySQL databases, whether for testing and debug purposes or at a minimum creating and restoring backups. As database sizes increase this poses risks particularly, for example, with large innodb based applications like Magento where database sizes can easily go into the gigabytes.

The Basics

The process for creating and restoring a snapshot is trivial

$ mysqldump -uuser -p mydatabase > mydump.sql    # export
  $ mysql -uuser -p mydatabase < mydump.sql        # import
  

For the most part this works as you expect it to, and for small databases this is probably all that is needed. You may find the resultant .sql file is huge, it is after all uncompressed text, at 1 byte per character if the output is ANSI or up to 4 bytes if your character set is UTF-8. Bzip2 will bring the file size down a considerable amount but it’s also considerably slower than gzip.

It’s sometimes tempting to gzip/bzip2 your datadump while performing the mysqldump in a single line.

$ mysqldump -uuser -p mydatabase | bzip2 -c > mydump.sql.bz2
  

While it seems a nice efficient way to do your backup, this should be avoided as (by default in MyISAM) you’re locking tables and denying other clients access to them. InnoDB implements row level locking which is slightly less offensive, but still should be avoided as much as possible.

When importing a large database, the choice of zip format is important. You have to trade off decompression speed, with filesize. The extra cputime consumed decompressing a bzip2 datadump may actually be less preferable to a few extra megabytes gained by using the faster gzip. Whatever your choice, importing a zipped datadump is very easy.

$ gunzip -c mydump.sql.gz | mysql -uuuser -p mydatabase  # importing a gzipped datadump
  $ bunzip2 -c mydump.sql.bz2 | mysql -uuuser -p mydatabase # importing a bzip2 datadump
  

Locking and Transactional Integrity

As explained briefly above, MySQL’s storage engines come with some limitations. In the worst case, with MyISAM, while performing a mysqldump entire tables will be locked, that means other clients will not be permitted to write to a table while the dump is being performed. If you have large MyISAM tables this poses clear problems when backing up a running application.

InnoDB is slightly better because it uses row level locking. It locks only the rows affected by a query, and not the whole table. This makes a conflict far less likely to occur while performing a backup on a running application. InnoDB as a transactional storage engine does allow for the possibility that active transactions may be underway while you’re attempting your backup.

Two options we can pass to mysqldump mitigate these issues are, —single-transaction and —skip-lock-tables.

$ mysqldump --single-transaction --skip-lock-tables mysql -uuser -p mydatabase
  

The use of —single-transaction means mysql issues a begin statement before dumping the contents of a table, ensuring a consistent state of the table without blocking other applications. It means writes can occur while the backup is taking place and this will not affect the backup. The —skip-lock-tables option stops MyISAM tables being locked during the backup. This does mean the integrity of the table can be lost as writes occur to them during the backup process. The risk is weighed up against the risk of blocking access to the table during a lengthy backup process.

Improving Import Performance

Choice of zip format will have a large bearing on import performance. Gzip is appreciably faster than bzip2. Other options you can pass to mysqldump to improve import performance are —disable-keys and —no-autocommit.

Disabling keys significantly improves the performance of imports as mysql will only index the table at the end of the import. With keys enabled, the index is updated after each row is inserted. Given you are performing a batch import, this is suboptimal.

By default each statement in an InnoDB table is autocommitted. This comes with unneccessary overhead when performing a batch import as you really only need to commit once the table has been fully imported.

Further Reading

This only a brief look at using Mysqldump for backups. It’s a common enough development task that all developers should take the time to see how it can be best leveraged for their environment. There’s plenty of documentation out there on using the tool. But the best place to start is with the official docs.

Text

PHP projects are becoming ever larger and with that size comes complexity that can be difficult to manage.

Typically a PHP project will start off small, some basic webpage views, maybe a few forms, and likely, some sort of search functionality. This is pretty basic and if things need to change, you can normally change it in place, directly on the web-server and without too much grief.

At some point though entropy takes its toll and incremental changes have so may unintended side-effects it's no longer feasible to safely make edits in-place. A quick hack directly on the web-server stops being a 'quick win', and more like a game of Russian Roulette.

This is where unit and integration testing comes to the fore. A safety net to protect us when we start changing an application. But often getting a test environment set-up and representative of the live system is a lot of work in itself, and the temptation to just give into the 'Inner Pig' is too great. That is, to not bother running any tests, and just cross fingers.

Jenkins makes this a lot easier by doing much of the heavy lifting of building and running tests. It will check that code complies with defined style conventions. It can also check for common coding smells (copy/paste, duplication, long methods, large classes, poor expressions) and it can run custom scripts depending on the success of unit and integration tests.

Essentially Jenkins ensures that any changes that go into source control, do not 'break the build' in a process known as Continuous Integration.

Installation is very easy. Visit the Jenkin's site, follow the instructions for your platform and you'll have a Jenkins's install running (by default) at http://localhost:8080. I have also written a small installation tutorial: Installing Jenkins on Ubuntu/Debian Systems.

To get Jenkins initially dressed up for PHP follow the jenkins-php.org site upto and including the setup the Pear packages and Jenkins plugins.

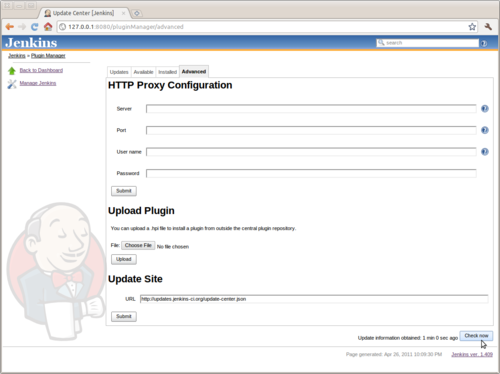
You may or may not run into trouble with these instructions. For the most part it worked fine for me, however I chose to use the cli-tool and the plugin repository was not initialised. To get up and running, I had to force the plugin list to refresh manually.

Jenkins plugin list

Manage Jenkins > Manage Plugins > Click the Advanced Tab

If you're like me and want git or svn scm access, you'll want to install these plugins as well, as they are not included in the list on the jenkins-php instruction page.

Once the PEAR packages and Jenkins Plugins are installed, you're now ready to start preparing your application for Continuous Integration.

The initial configuration can be quite terse, as you will need an initial ant build file, and sample configurations for PHP Code Sniffer and the other code analysis tools. Thankfully Sebastian Bergmann - author of PHPUnit and much of the Jenkins PHP suite of tools - has developed a project wizard utility to simplify these initial configuration steps.

Install the PHP Project Wizard from the PHPUnit channel:

$ sudo pear install phpunit/ppw
  

Once installed, you can change into your project dir and run it with a few arguments to setup your initial build environment.

$ ppw --name 'My Project' --source ./lib --tests ./tests
  

You can also specify arguments defining default rulesets for PHP Code Sniffer and PHP Mess Detector. Omitting these arguments sees ppw select some sane defaults for you.

Now install the Jenkins PHP Job Template:

$ cd path/to/jenkins/jobs
  $ git clone git://github.com/sebastianbergmann/php-jenkins-template.git php-template
  $ chown -R jenkins:nogroup php-template/
  $ curl http://localhost:8080/reload # set this to be the path:port to your jenkins server
  

Jenkins and your system are now ready to manage a PHP Project. Please see my tutorial on Setting up a PHP Project in Jenkins for how to setup your first project in Jenkins.