Text

If you have a string, for example

"The quick brown fox", "The quicker brown fox".

If you try and use the VIM substitute regexp s/"The quick brown."// you'll end up nuking the whole line up to the terminating period mark. This is because the regular expression is acting greedily, and matching up to the second and final " character.

In PERL compatible regexps you would simply modify the expanding part of the regexp to be .? which makes the expression match as little as possible.

In VIM the syntax is slightly different. To do a non-greedy expansion, you use .{-}. For example:

s/"The quick brown.{-}"//

This will leave you with

, "The quicker brown fox".

Tags: vim editors regex
Text

Create a new repository

$ git init <dirname>
  

Creates a new bare git repository in the current directory, or if a directory argument is given, in that directory.

Version control a file

$ git add file|dir <file|dir> ...
  

Adds, or to use git terminology ‘stages’ a file for a local commit.

Remove a version controlled file

$ git rm -rf --cached <file|dir>
  

This removes a file that has been previously staged (i.e added) for local commit. It does not remove the local file. If you omit the —cached option, the local file WILL be deleted. The rm command is roughly analagous to: $ svn del

Make a local commit

$ git commit <-a> -m 'Commit message' <file> ...
  

The -a flag will commit all pending files recursively in the current path, alternatively you can specify the exact files to commit at the end of the command separated by spaces.

See pending actions or status

$ git status <-u no|all|normal> <path> ...
  

Will show pending files and untracked files in the current working path. Optionally the -u (—untracked-files) option can be supplied to hide/show untracked files in the status report. Passing a path, or number of paths will run the status for that path rather than the current directory.

Create a bare centralised remote repository

$ git clone --bare pathtoinitialrepo <myrepo.git>
  

Alternatively if you don’t have an existing repo already:

$ git init --bare <path>
  

Often you’ll see the .git extension bandied about, particularly on github. This is a canonical reference to a bare git repository (i.e. only has the meta information and not a working copy) that is usually acts as a master or central repository.

Configuring a local repository to push to a remote

$ cd pathtoinitialrepo
  $ git remote add origin ssh://[email protected]/~/repos/myrepo.git
  $ git push origin master
  

If you initially clone from the remote repository you can skip the first step of setting up the origin. However if you have just created a new bare remote repository and want to setup an initial commit, you need to setup the origin first. Subsequent pushes to the remote repository can be done with git push origin master. This is the familiar model of subversion and svn commit.

Create a local copy of a remote git repository

$ git clone ssh://[email protected]/~/repos/myrepo.git
  

Create a local copy from remote repository created following the above approach.

Ignore changes to a tracked file

$ git update-index --assume-unchanged <file>
  

Use this command if you’ve added a file, e.g. a database defaults config file, but do not want further changes to be picked up for it.

To resume tracking changes to the file use:

$ git update-index --no-assume-unchanged <file>
  
Text

I'm currently investigating how best to integrate tumblr with vim and markdown, and looking to ruby to provide some help.

I'm still very new to Ruby and its tooling so I was finding it hard to see the details of available remote gems.

I was labouring:

$ gem search --remote tumblr
*** REMOTE GEMS ***
  integrity-tumblr (0.1.1)
  matenia-tumblr-api (0.1.6)
  ruby-tumblr (0.0.2)
  skinnycms_tumblr (0.0.2)
  tumblr (2.2.0)
  tumblr-api (0.1.4)
  tumblr-rb (1.3.0)
  tumblr4r (0.7.2)
  tumblr_cleanr (0.0.1)
  

Then for each interesting result: 

$ gem specification --remote <gem>

This brought back a lof interesting information but it is hardly an efficient way to browse. Digging into the docs I found an easier way.

$ gem search -r -d tumblr
*** REMOTE GEMS ***
  integrity-tumblr (0.1.1)
      Author: Mat&#237;as Flores
      Rubyforge: http://rubyforge.org/projects/integrity
      Homepage: http://github.com/matflores/integrity-tumblr
      Tumblr notifier for the Integrity continuous integration server
   
  matenia-tumblr-api (0.1.6)
      Author: Jeff Kreeftmeijer, Matenia Rossides
      Homepage: http://github.com/matenia/tumblr
      Tumblr API wrapper - maintained by matenia

The -r is the short notation for --remote, and -d is the short notation for --details. The default for the search action is --no-details, which is why the initial resultset was so unhelpful.

Text

Text

I've had PEAR act up on 3 different Natty installs, generally it's shirtiness manifests itself when you go

$ sudo pear upgrade-all
  > PHP Fatal error:  Call to undefined method PEAR::raiseErro() in /usr/share/php/PEAR/REST.php on line 165
  PHP Stack trace:
  ...

You can fix this nuisance:

$ sudo mkdir -p /tmp/pear/cache
  $ sudo pear upgrade-all

Hope this helps save someone some time!

Text

Just learned you can go

$ gem server

Open your browser and go to 127.0.0.1:8808 and read all the api docs for your installed gems (i.e Rails and friends).

That, is very cool!

Text

PHP projects are becoming ever larger and with that size comes complexity that can be difficult to manage.

Typically a PHP project will start off small, some basic webpage views, maybe a few forms, and likely, some sort of search functionality. This is pretty basic and if things need to change, you can normally change it in place, directly on the web-server and without too much grief.

At some point though entropy takes its toll and incremental changes have so may unintended side-effects it's no longer feasible to safely make edits in-place. A quick hack directly on the web-server stops being a 'quick win', and more like a game of Russian Roulette.

This is where unit and integration testing comes to the fore. A safety net to protect us when we start changing an application. But often getting a test environment set-up and representative of the live system is a lot of work in itself, and the temptation to just give into the 'Inner Pig' is too great. That is, to not bother running any tests, and just cross fingers.

Jenkins makes this a lot easier by doing much of the heavy lifting of building and running tests. It will check that code complies with defined style conventions. It can also check for common coding smells (copy/paste, duplication, long methods, large classes, poor expressions) and it can run custom scripts depending on the success of unit and integration tests.

Essentially Jenkins ensures that any changes that go into source control, do not 'break the build' in a process known as Continuous Integration.

Installation is very easy. Visit the Jenkin's site, follow the instructions for your platform and you'll have a Jenkins's install running (by default) at http://localhost:8080. I have also written a small installation tutorial: Installing Jenkins on Ubuntu/Debian Systems.

To get Jenkins initially dressed up for PHP follow the jenkins-php.org site upto and including the setup the Pear packages and Jenkins plugins.

You may or may not run into trouble with these instructions. For the most part it worked fine for me, however I chose to use the cli-tool and the plugin repository was not initialised. To get up and running, I had to force the plugin list to refresh manually.
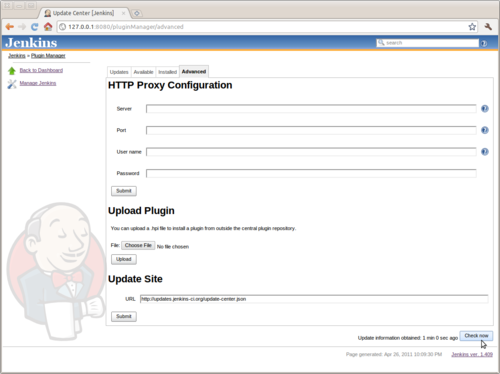
Jenkins plugin list

Manage Jenkins > Manage Plugins > Click the Advanced Tab

If you're like me and want git or svn scm access, you'll want to install these plugins as well, as they are not included in the list on the jenkins-php instruction page.

Once the PEAR packages and Jenkins Plugins are installed, you're now ready to start preparing your application for Continuous Integration.

The initial configuration can be quite terse, as you will need an initial ant build file, and sample configurations for PHP Code Sniffer and the other code analysis tools. Thankfully Sebastian Bergmann - author of PHPUnit and much of the Jenkins PHP suite of tools - has developed a project wizard utility to simplify these initial configuration steps.

Install the PHP Project Wizard from the PHPUnit channel:

$ sudo pear install phpunit/ppw
  

Once installed, you can change into your project dir and run it with a few arguments to setup your initial build environment.

$ ppw --name 'My Project' --source ./lib --tests ./tests
  

You can also specify arguments defining default rulesets for PHP Code Sniffer and PHP Mess Detector. Omitting these arguments sees ppw select some sane defaults for you.

Now install the Jenkins PHP Job Template:

$ cd path/to/jenkins/jobs
  $ git clone git://github.com/sebastianbergmann/php-jenkins-template.git php-template
  $ chown -R jenkins:nogroup php-template/
  $ curl http://localhost:8080/reload # set this to be the path:port to your jenkins server
  

Jenkins and your system are now ready to manage a PHP Project. Please see my tutorial on Setting up a PHP Project in Jenkins for how to setup your first project in Jenkins.

Text

Sometimes in a foreign language, you will see a word that has some meaning to you in your native language. Often, these will be cognates and have the same meaning in the foreign language, such as 'green' and 'grün' in German. Sometimes it can have a completely different meaning, such as 'bad', (which means bath in German). These are commonly called false friends.

It's similar with programming languages, some familiar constructs will work exactly the same as you expect. Some wont work at all, and in some cases, they'll sort of work. 

In Ruby, if you're like me and come from a C, Unix or PHP background, one of the first things to trip you up will be ARGV.

In PHP ARGV works like this:

<?php
  // test.php
  echo $_SERVER['argv'][0] ?> 
  $ php test.php 1234 
  > test.php
  

C and BASH work the same way.

Ruby does things a different (PERL) way:

#!/usr/bin/env ruby 
  # file test.rb 
  puts ARGV[0] 
  $ ruby test.rb helloworld 
  > helloworld 
  

The difference is, in PHP, C, BASH the first element of ARGV is the program's name. In Ruby, and in PERL, it is the first argument passed into the program. 

I'm trying to think which makes more sense, probably the Ruby/PERL implementation. I'm used to starting at index 1 though. So just bear in mind that even though constructs may be similar between languages, there is some devil in the detail.

Text

Text

Uninstalling software is not the most straight forward thing to do in the 3.6 release of Eclipse.

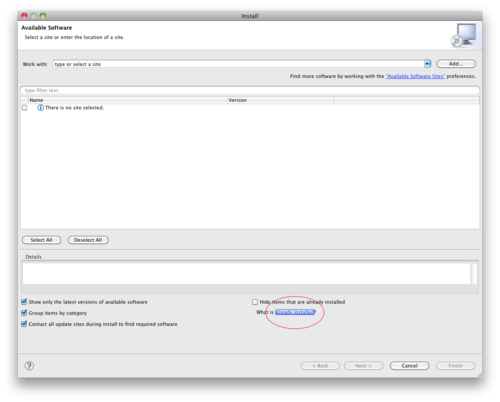
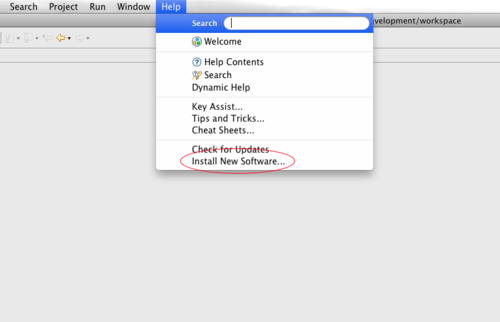
Actually, it is a little bit like clicking 'start' to shutdown oin windows. To uninstall a plugin / feature you need to go to the install new software screen. On a Mac it's found by highlighting the help menu and selecting "Install New Software".

In the resulting window, there's a link which lets you view already installed software.

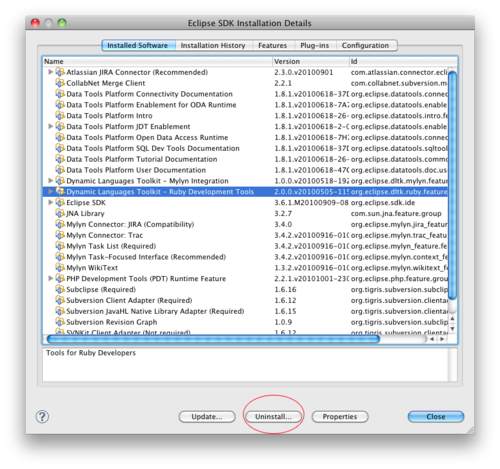
Clicking that link brings you to the installation details page which (assuming there are no dependency issues) lets you uninstall unwanted features.

Uninstall the unwanted software and restart Eclipse and you're good to go.

Tags: eclipse
Text

If you're running OSX Snow Leopard and Macports MySQL, you might run into some drama trying to get Ruby and Mysql playing nicely together.

This can manifest itself in a number of ways, but the most common, I think, is what happened with me

aaron ~/Development/ruby/testapp $ rake db:create (in /Users/aaron/Development/ruby/testapp) Couldn't create database for {"reconnect"=>false, "encoding"=>"utf8", "username"=>"dbuser", "adapter"=>"mysql", "database"=>"testapp_development", "host"=>"127.0.0.1", "pool"=>5, "password"=>"testpwd"}, charset: utf8, collation: utf8_unicode_ci (if you set the charset manually, make sure you have a matching collation)

Seems the mysql driver gets confused a little bit as when you install the MySQL Rubygem as directed by Rake, you link against the bundled OSX MySQL and not the Macports one.

The solution is to install the mysql gem as follows (uninstalling it first, if necessary)

sudo env ARCHFLAGS="-arch x86_64" gem install mysql -- --with-mysql-config=/opt/local/bin/mysql_config5

Substitute the mysql_config5 path with your own macports mysql_config path. Afterwards, everything should work fine.

aaron ~/Development/ruby/testapp $ rake db:create (in /Users/aaron/Development/ruby/testapp)

Text

When working with a lucene index using the Zend Framework's lucene search component you'll often in the course of the index's lifecycle want to update documents. This can prove tricky with the current implementation as there is no insitu update feature, you must first delete the old document and add a new one. The tricky part is locating the unique document you want to update. The 'old way' was as following:

// Retrieving documents with find() method using a query string
  $query = $idFieldName . ':' . $docId;
  $hits  = $index->find($query);
  foreach ($hits as $hit) {
      $title = $hit->title;
      $contents = $hit->contents;
  }

This proves _painfully_ slow, you're loading the full index in an attempt to find a unique document with an ID. Even worse is if your unique ID happens to be a string such as a url or path. Since ZF 1.5, the 'best practice' direction to perform this type of task is to use the Zend_Search_Lucene::termDocs() method:

$term = new Zend_Search_Lucene_Index_Term('/somepath/somewhere', 'path');
  $docIds = $index->termDocs($term);
  foreach ($docIds as $id) {
      $doc = $index->getDocument($id);
      $title = $doc->title;
      $contents = $doc->contents;
  }

Performance wise this proves much more efficient. However, unless you're careful at the indexing stage you may run into trouble when running termDocs() on a string value such as a URL or path as opposed to an integer ID. This is down to the field being added tokenized. This is the most common way fields are added and corresponds to:

$doc = new Zend_Search_Lucene_Document();
  $doc->addField(Zend_Search_Lucene_Field::Text('title', $title));

If you want to use termDocs on an identifying field you need to add the field as type Keyword:

$doc = new Zend_Search_Lucene_Document();
  $doc->addField(Zend_Search_Lucene_Field::Keyword('http://a.com/uri', 'uri'));

Keyword fields are not tokenized, and a term vector (which termDocs() requires) is stored, the distinction between the two field types is documented in Zend_Search_Lucene_Field's phpdocs:

Zend_Search_Lucene_Field::Text() constructs a String-valued Field that is tokenized and indexed, and is stored in the index, for return with hits. Useful for short text fields, like "title" or "subject". Term vector will not be stored for this field.

In contrast see:

Zend_Seach_Lucene_Field::Keyword() constructs a String-valued Field that is not tokenized, but is indexed and stored. Useful for non-text fields, e.g. date or url.

This caught me out a little bit until I dug around the source a little bit looking to see where termDocs was going wrong. Hopefully this helps save someone else some time, and hopefully Zend can update their documentation to draw other developers' attention to this quirk.

Text

One of the nicer, and largely unheralded I think, features of PHP 5 is its comprehensive reflection API. Arguably one of the reasons it is largely unheralded is because its documentation is a bit average. One great little tidbit, and the motivation for the blog post, is the ReflectionClass->getMethods($filter=null) method takes an optional parameter 'filter'. In the online documentation there is scant mention of what values this $filter parameter can take. Luckily in the comments Will Mason chimed in with paydirt:

If you are looking for the long $filters for ReflectionClass::getMethods(), here they are. They took me a  long time to find. Found nothing in the docs, nor google. But of course, Reflection itself was the final solution, in the form of ReflectionExtension::export("Reflection").
// The missing long $filter values!!!
  ReflectionMethod::IS_STATIC;
  ReflectionMethod::IS_PUBLIC;
  ReflectionMethod::IS_PROTECTED;
  ReflectionMethod::IS_PRIVATE;
  ReflectionMethod::IS_ABSTRACT;
  ReflectionMethod::IS_FINAL;
  
  // Use them like this
  $r = new ReflectionClass("MyClass");
  // Print all public methods
  foreach ($r->getMethods(ReflectionMethod::IS_PUBLIC) as $m) {
      echo $m->__toString();
  }
  

Another example, this time one of my own, is one that I found myself writing while working with the Zend Framework's Zend_Controller implementation:

/**
   * @param   String $controller_class
   * @return   ArrayObject
   */
  private function getActionList($controller_class)
  {
      $reflection_class = new ReflectionClass($controller_class);
      $methods = $reflection_class->getMethods(ReflectionProperty::IS_PUBLIC);
      return new ArrayObject($methods);
  }
  

Like many platforms, in PHP it seems documentation is no replacement for digging around the source itself.

Tags: php reflection
Text

Came across this brilliant GOF pattern cheatsheet/cheatcard on DZone. Essentially it's the GOF creational, behavioural and structural patterns distilled down in a sort of periodic table format and in suitable format for printing to A3. Like most developers whenever starting a new unit of code I find myself heading to the c2 wiki, or if I am at home, flicking through to the back pages of the GOF book or if in a pinch, hitting Vince Huston's The Sacred Elements of the Faith site. This chart helps speed things up a bit. Check out: http://www.dzone.com/links/design_patterns_quick_reference.html Or download the card directly: http://www.mcdonaldland.info/files/designpatterns/designpatternscard.pdf

Text

UTF-8 internalisation support is pretty big deal if you want to localise your forums for non-native English speakers. Thankfully though it isn't a complete trial to retro fit VBulletin with basic UTF-8 support. This guide assumes a remotely recent version of VBulletin (I was using 3.6.8 at time of writing) and that you are using MySQL 5.x.

Firstly you need to backup your forum database, the simplest way is to make use of the mysqldump utility.

mysqldump -uusername -ppassword forum_db_name > forum_db_backup.sql

Copy this output somewhere safe just incase of disaster. You can always revert to what you had by reimporting from this dumpfile. By default VBulletin applies the 'latin1' charset to its schema. We want to replace all instances of this in the dumpfile with 'utf8'.

sed -i 's/latin1/utf8/g' forum_db_backup.sql

Now it's time to take your forum offline. Navigate to: AdminCP -> VBulletin Options - > Turn your VBulletin on/off and change the forum active option to off. When this is done, just for good measure, 'chmod 000' the forum root directory.

Drop the old VBulletin forum database and create a new, utf8 friendly, one.

mysql --user=username --password=password --execute="DROP DATABASE forum_db_name; CREATE DATABASE forum_db_name CHARACTER SET utf8 COLLATE utf8_general_ci;"

It's time to convert the old database dump to use the UTF-8 character set. My favourite utility to do this is iconv. This util can easily be installed using yum, apt, emerge, synaptic or whatever package manager your distro relies on

iconv -f latin1 -t utf-8 forum_db_backup.sql > forum_db_backup-utf8.sql

Pump the fixed SQL back into your database.

mysql -uusername -ppassword forum_db_name < forum_db_backup-utf8.sql iconv -f iso8859-1 -t utf-8 vbulletin-language.xml > vbulletin-language-utf8.xml

Then import the language in the usual way AdminCP -> Languages & phrases -> Download/upload languages.